Foundation Waterproofing Protocols to Avoid Capillary Rise in Walls During a Residential Building Construction.
by Babu George
Originally published on January 30, 2024, 10:38 pm, updated on July 20, 2025
scroll downIntroduction:
Building a home is a substantial investment, and ensuring a strong and waterproof foundation is paramount for the long-term stability & longevity of your residence. One of the critical challenges homeowners’ face is the potential threat of capillary rise, a phenomenon where moisture is drawn upward through porous materials such as cement plastering, bricks etc affecting the lower part of inner walls. Beyond the cosmetic concerns of unsightly damp patches, the hazards associated with capillary rise can be extensive and detrimental to the structural integrity of your home.
Hazards of Capillary Rise:
1. Structural Damage:
Capillary rise can lead to structural damage within the walls if they are load bearing. As moisture ascends through the porous materials, it weakens the structural components, compromising the overall stability of the foundation. Over time, this can result in cracks, crumbling, and the deterioration of the load-bearing elements, posing a significant risk to the structural integrity of the entire building.
2. Mold and Mildew Growth:
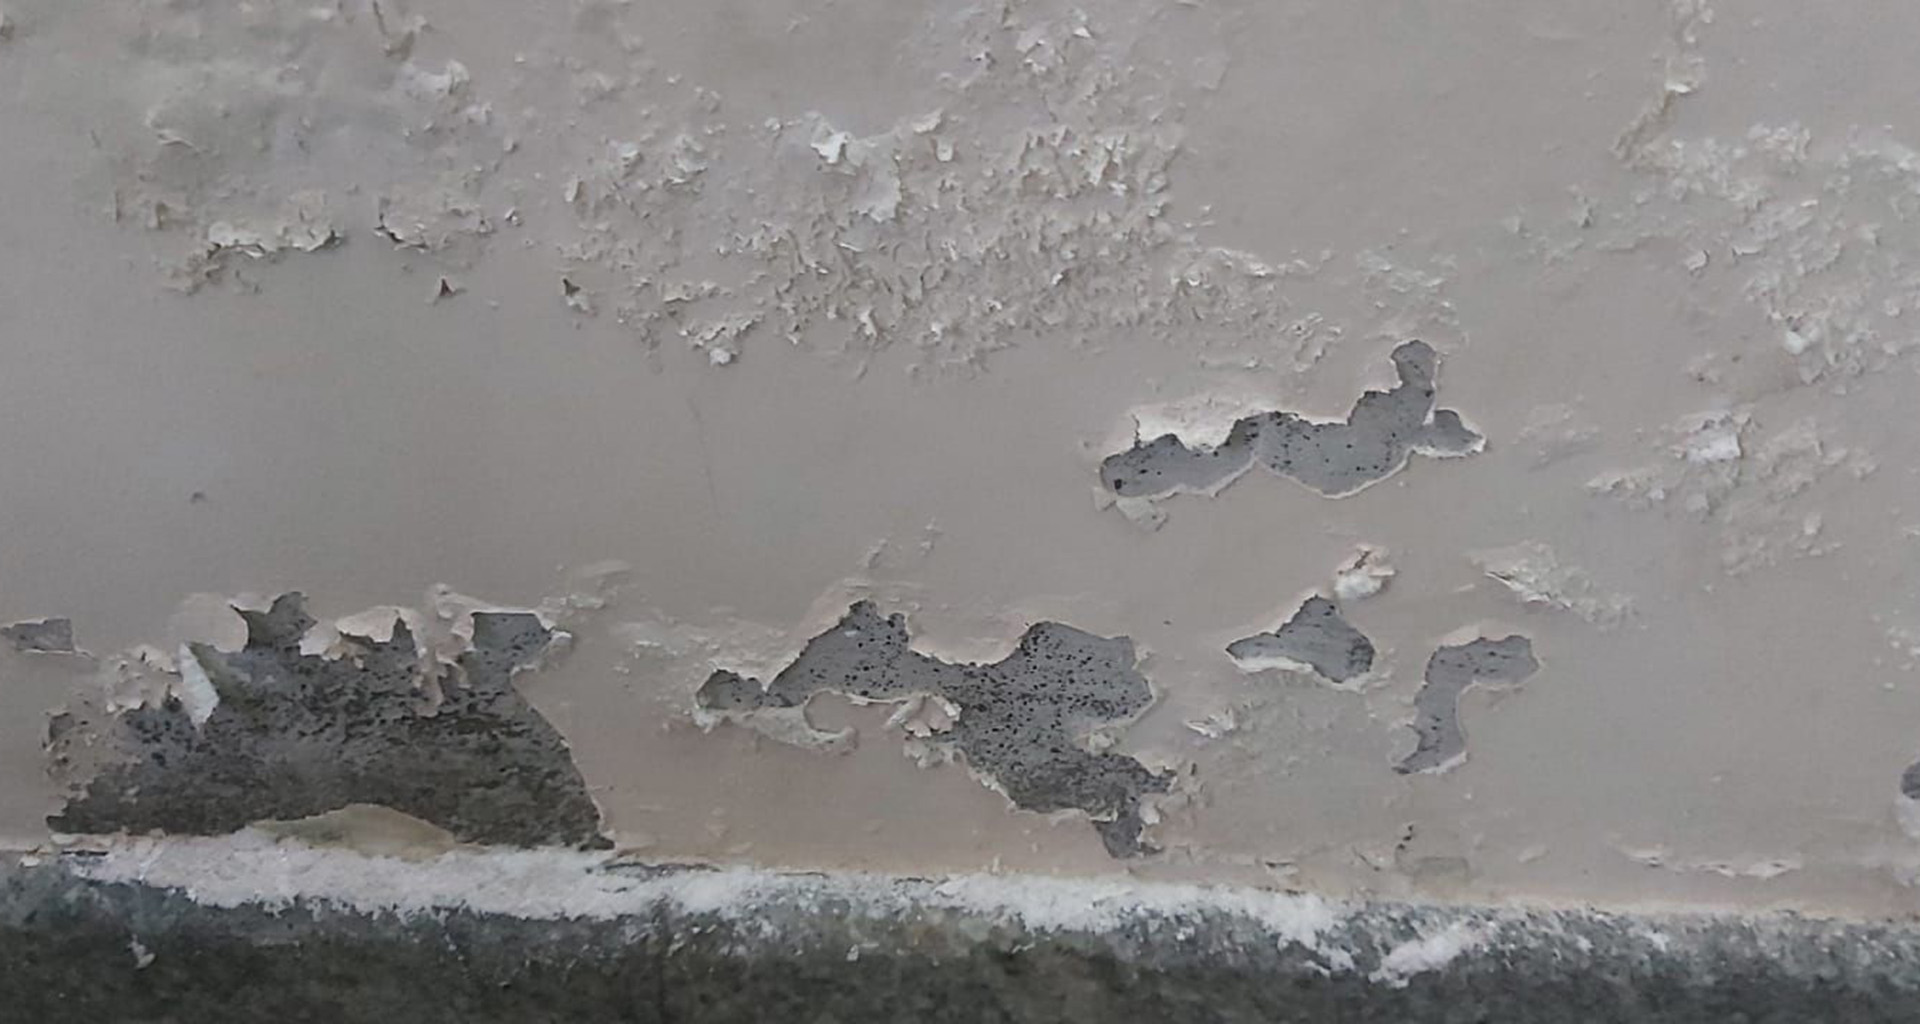
Image – 1 | Mold and mildew growth on damp walls due to capillary rise | © UniPro Waterproofing
The upward movement of moisture provides an ideal environment for the growth of mold and mildew. These fungal infestations not only contribute to an unhealthy living environment but can also cause respiratory issues and allergic reactions. Mold and mildew thrive in damp conditions, and capillary rise creates the perfect breeding ground within the walls of your home.
3. Health Risks:
The presence of mold and mildew due to capillary rise can pose health risks to the occupants. Inhaling mold spores can trigger respiratory problems, allergies, and other health issues. Addressing the root cause of capillary rise during the construction phase is crucial to maintaining a safe and healthy living space for you and your family.
4. Degradation of Building Materials:
Continuous exposure to moisture from capillary rise can lead to the degradation of building materials. This includes not only the walls but also the foundation and supporting structures. Degradation of materials can result in increased maintenance costs and, in extreme cases, may necessitate costly repairs or even structural reinforcements.
5. Compromised Insulation:
Moisture infiltration through capillary rise can compromise the effectiveness of insulation within the walls. Wet insulation loses its thermal resistance, leading to reduced energy efficiency and increased utility costs. Over time, this can result in discomfort for occupants and a greater environmental impact due to higher energy consumption.
In light of these hazards, it is evident that addressing capillary rise during the construction phase is not just about aesthetics; it is a proactive measure to safeguard your investment, protect the well-being of your family, and ensure the long-term durability of your home. In other words, it is not optional, but a must.
We at UniPro, over years has been trying to identify the main cause which leads to capillary rise. The information provided in this article are the outcome of those years of arduous, laborious research.
Our attempt here is to provide a comprehensive reference guide to home owners, architects, construction engineers and other members of the construction industry fraternity of how to waterproof the foundation, mitigating the risks associated with capillary rise, and creating a secure and resilient living space for generations to come.
Also Read Article: Toilet Floor Waterproofing without Breaking Tiles: A Three-Tiered Approach
Protection of the Plinth Beams
As many of our localities are prone to floods, it is a usual practice to elevate the floors of their new homes to avoid any chance of flood water entering the house. Two processes are generally seen in practice:
- A monolithic plinth beam alone is used to elevate the height staring from 60 or 65cm and above depending on the floor height required from the current earth level. In this case the plinth beam also act as the DPC. See image – 2
- In this second method which is polylith foundation, the floor elevation is achieved with a combination of plinth beam(40-45cm), 2 or 3 rows of brick linings on top of plinth beam (typically about 23cms) and topped up with a DPC(Damp Proof Course) of 10 cm. See image – 3
Of course, the waterproofing process and the protection of these structures will differ in both scenarios.
The first step in our foundation waterproofing process in both cases involves reinforcing the strength of plinth beams. Cement laitance, loose particles etc and removed by grinding in this step, creating a robust foundation core. Any honeycombs found on the plinth beams are repaired using Polymer Modified Mortar (PMM). This plays a pivotal role in enhancing its structural integrity.
Further, in the first case, the plinth beams are protected using high build chemical resistant compounds up to its full height in the outer area and up to its height leaving 10 cm in the inner area. (For eg, if the plinth beam height is 65cm, only 55cm of the inner portion will be treated in the inner area.) There is a reason for omitting that 10cm of inner area of plinth beam. We will come to that at a later point.
You can also leave the plinth beam exposed without any protection if it is above M25 grade. But we highly recommend protecting it for two reasons:
- Anything kept protected lasts longer than left exposed without. We must understand that in most cases, major part of the plinth beams is immersed in earth and are prone to a variety of chloride and salt attacks. Your dream home has to stand for generations to come right?
- At the foundation stage we have free access to the plinth beam from all sides. Once the construction is complete and if so happens that a capillary is observed later, no foundational corrections can be done at that point rather than feeling sorry for missing out on the golden window of protecting it.
This process done in the case if the plinth beam is used at Damp Proof Course (DPC) and no masonry is being used to elevate the floor. See image 2 below.

Image – 2 | Monolithic plinth beam used as DPC | © UniPro Waterproofing
In the second scenario, we have observed that to save cost, the height of the plinth beam is reduced to 40 or 45 cms and two or three rows of bricks (about 23cms) are constructed on top of this. Further over this a DPC is constructed at a height of 10cm. (See below image – 3)
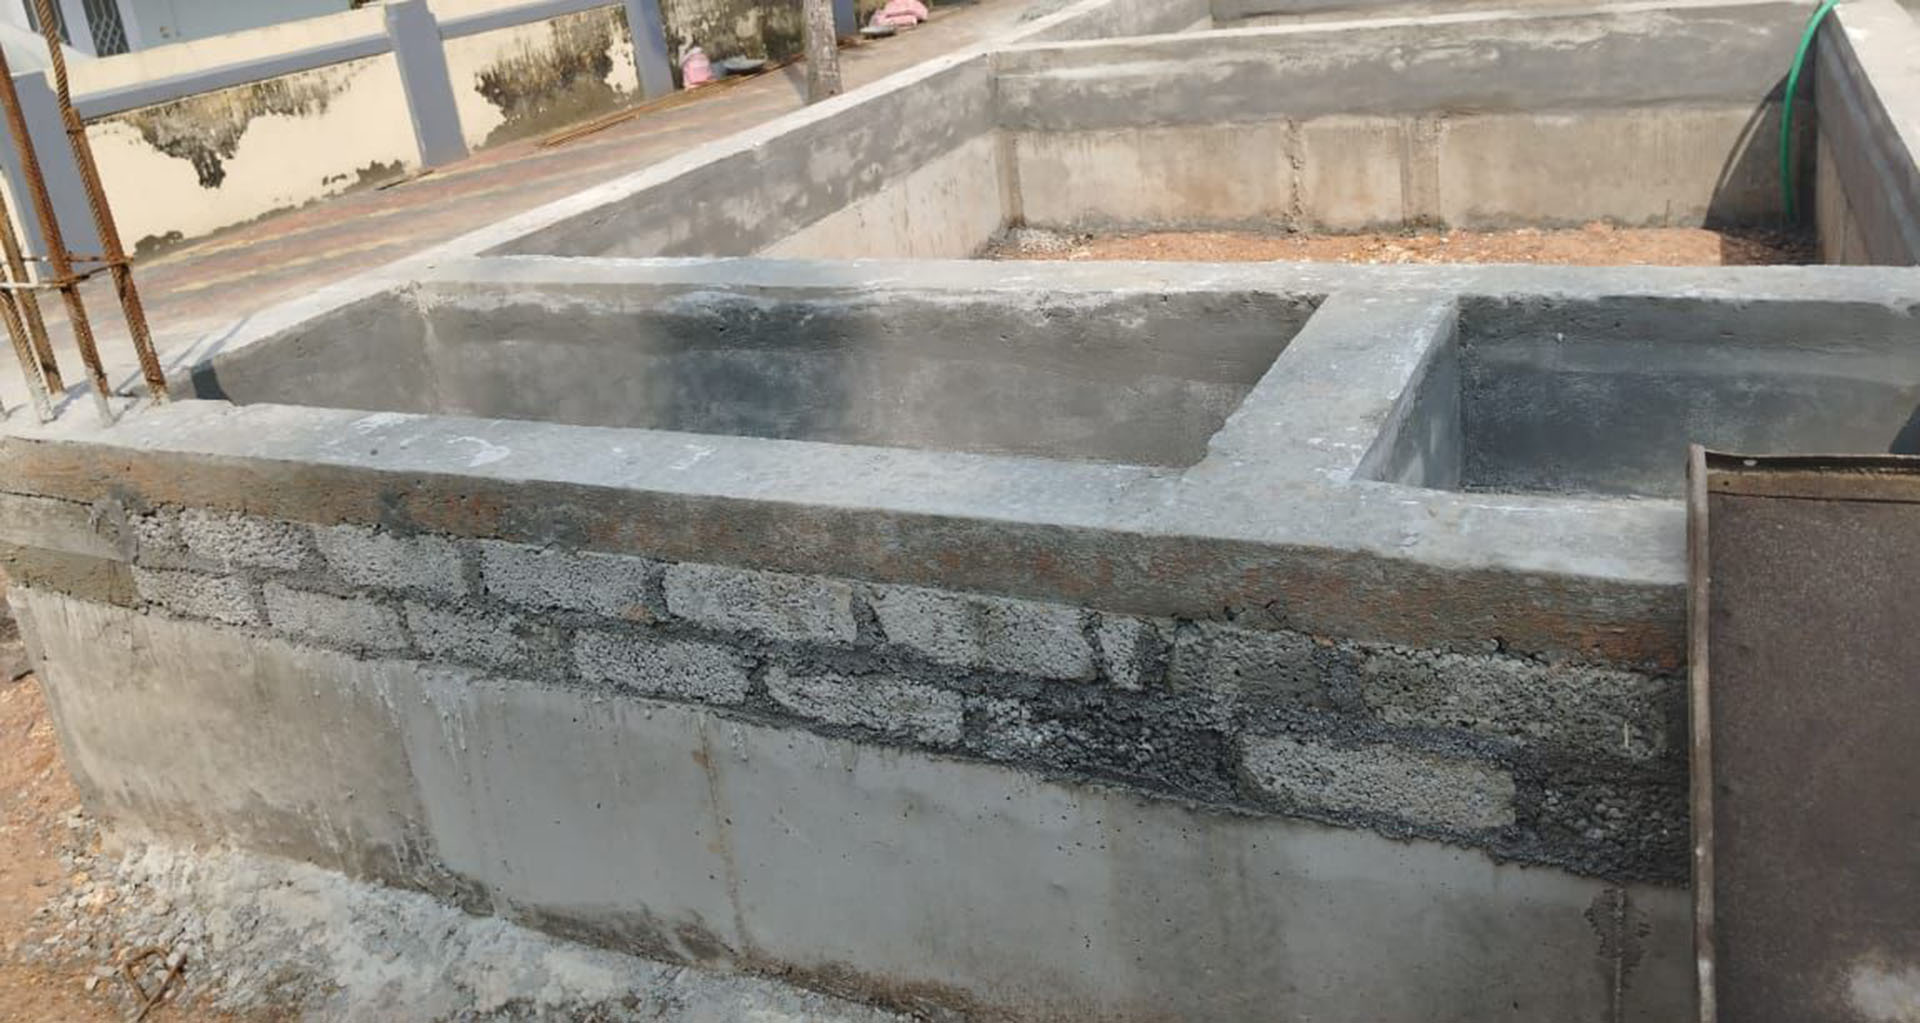
Image – 3 | Brick masonry sandwiched between plinth beam and DPC | © UniPro Waterproofing
Now treating this is a tricky part as we have intermittent structures of RCC, masonry and PCC and in some case DPC is done in RCC also. In most cases, people prefer to plaster the entire inner and outer area in total including the top portion of the DPC thinking that plastering will provide an additional protection which is a wrong construction practice. No doubt, this will result in capillary rise later from plinth inner area as well as outer area since plastering is porous.
Also Watch Video: How to Avoid Capillary Rise During Residential Construction
Instead, opt for the below process.
First step is to plaster the masonry portion alone (inner & outer) as shown in the below image – 4 excluding the plinth beam below and DPC above to provide a strong base for chemical treatment and this cannot be achieved on a bare brick.
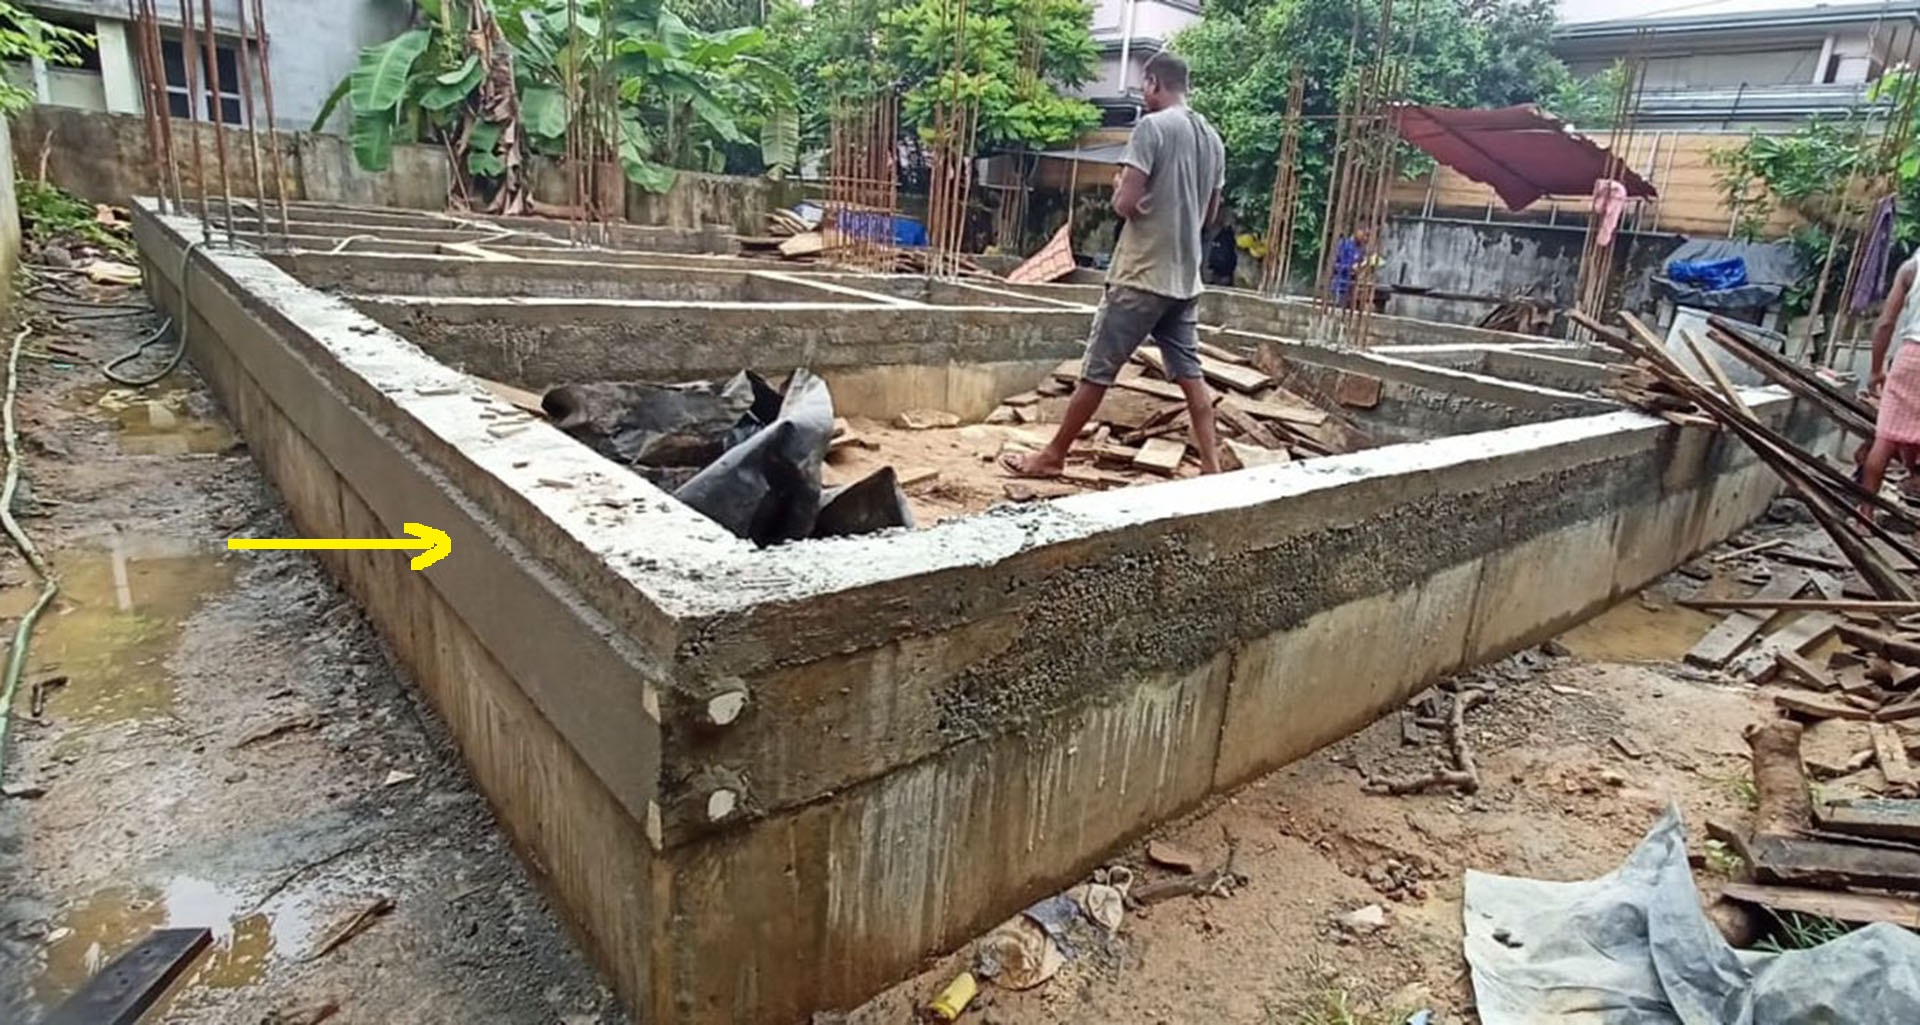
Image – 4 | Intermittent Masonry Plastering in Foundation | © UniPro Waterproofing
Second step is to provide high build chemical protection(See image – 5) to:
- The full height of the inner and outer part of plinth beam.
- Inner part of the plastering above plinth beam. Outer part of the plastering to be left free as it will be forming the part of front elevation.

Image – 5 | Plinth beam, intermittent masonry protected omitting 10cm DPC provisioning for U-Joint | © UniPro
Now that the plinth beam protection regimen is out of our hair, it’s time to talk about plastering.
To Plaster or Not to Plaster?
We strongly believe that RCC systems are designed to handle the perils of being a sub structure. But when you plaster it, it defeats the very core purpose. It is like wrapping a sponge around an iron column. In the image below(Image – 6) which is taken from one of our sites where plinth beam is not plastered, you can see that no capillary is observed despite water stagnating in the inner plinth area.
Hence, we recommend plinth beam in the inner area to be left free after the protection treatment and not to be plastered.
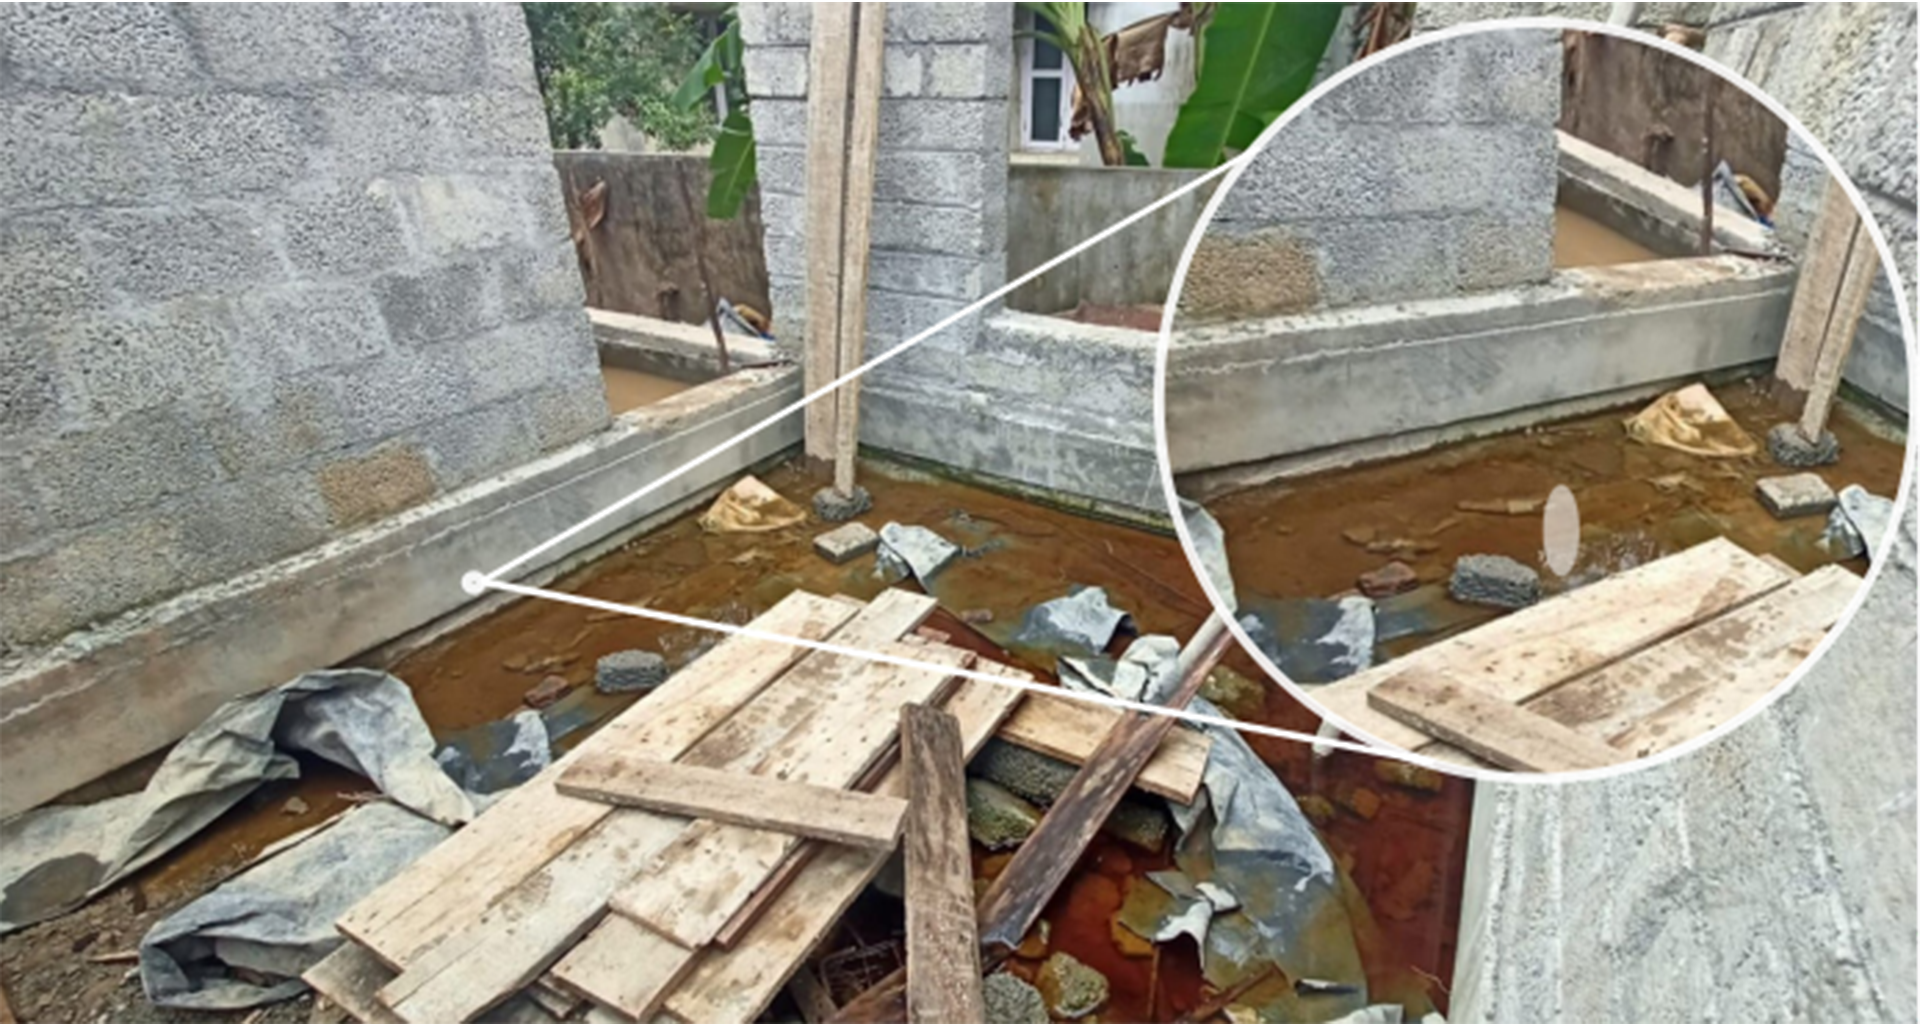
Image – 6 | No capillary rise observed in the plinth beam wall when not plastered | © UniPro Waterproofing
Now, we have a problem at hand on what to do with the outer part of the plinth or elevated floor wall as it forms to be a part of the facade and important for aesthetics. Well, go ahead and plaster it, but take precautions as mentioned below: –
- In the first scenario where the plinth beam alone is used without masonry, a ‘mirror C’ groove to be inserted just 10 cms below from the top of the plinth beam outer area before the CM plastering continues to the masonry wall above. The ‘mirror C’ groove to be minimum of 2.5mm and the depth will be the thickness of the plastering, say 13mm.(See image – 7)
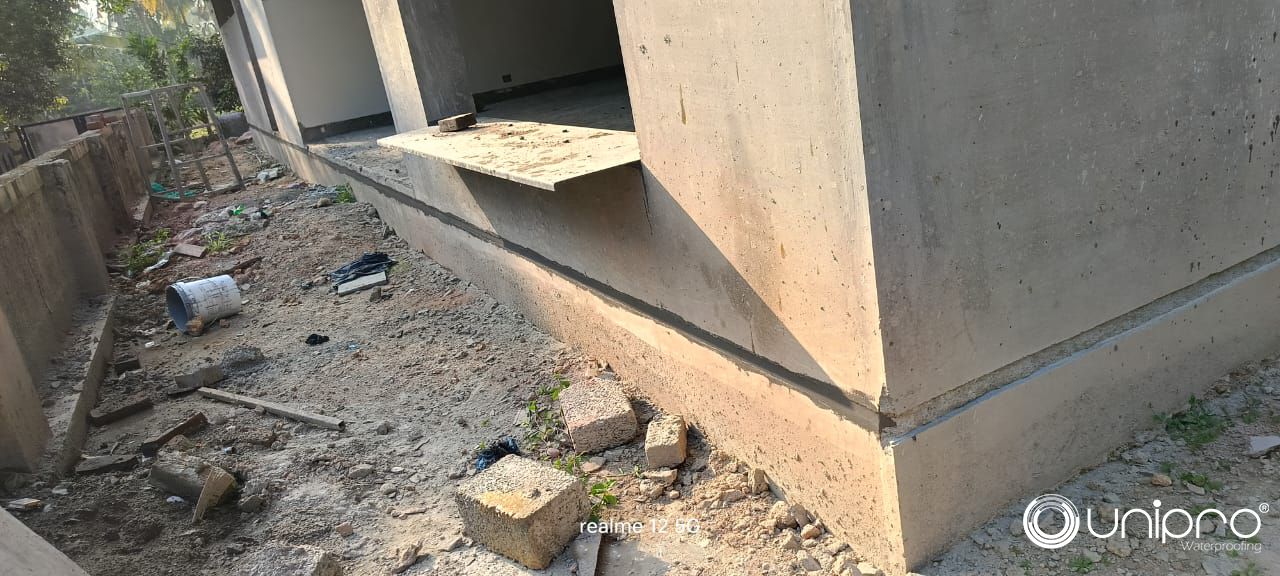
Image – 7 | Mirror C Groove installation in foundations | © UniPro Waterproofing
- In the second scenario where masonry is used to elevate the floor height and DPC comes on top, 2 mirror C grooves to be done in the outer wall plastering, first one to be inserted just 10 cms below from the top of the plinth beam outer area before the CM plastering continues to the masonry lining above and second groove to be provided right at centre portion of the DPC.(See image – 11)
- These ‘mirror C” grooves created thus to be filled with non-water absorbing, elastomeric waterproofing compounds which will ger concealed when overcoated with exterior emulsion painting.
This will provide you with an aesthetic flush plinth beam foundation, yet disconnected from the ground water in the outer area.
Now that the plastering issue is addressed, brings us to the issue of how to handle the inner area of the plinth. Well read on.
At this point we invite your attention to the part where we left a 10cm of the inner area of plinth beam or DPC without any treatment. This was strategic approach to implement a never before heard system called “U-Joint”
Also Watch Video: Important things to do before terrace tiling
The U-Joint
U-Joint is a foundation waterproofing system developed by our team through years of arduous research. (See image – 10 & 11)
To understand the significance of U-Joint we must understand the few things: –
We often see capillary rise in many residential buildings in spite of following the usual construction practices of constructing plinth beam, DPC etc. How?
Answer to this is that they exist in the foundation as per design, and unknowingly, we by-pass this system while laying the floor which defeats it purpose. Didn’t understand, right? Will explain.
Once the DPC level is achieved, next stage is to construct the external masonry walls, cast roof RCC slab, external & internal wall plastering etc among other regular civil works. May not be necessarily in the mentioned order. When the floor area is ready for tiling, the floor PCC work is being undertaken. Here there few things that happens usually which escapes our attention:
a) Creation of Capillary Spaces
The DPC wall is used as the perimeter while floor PCC is laid and the floor PCC joins the DPC perpendicularly and both are done in two time zones which creates a capillary between the floor PCC and DPC as no concerted effort is taken to properly compact this area.
b) Poor Quality of Floor PCC
- Commonly used floor PCC grades are M5, M7.5 and M10 which will absorb water more than a good grade of PCC in case of high-water table and resultant pressure.
- Aggregates used are 20 to 25mm which typically creates void where floor PCC joins the DPC.
c) ‘WoW’ Process:
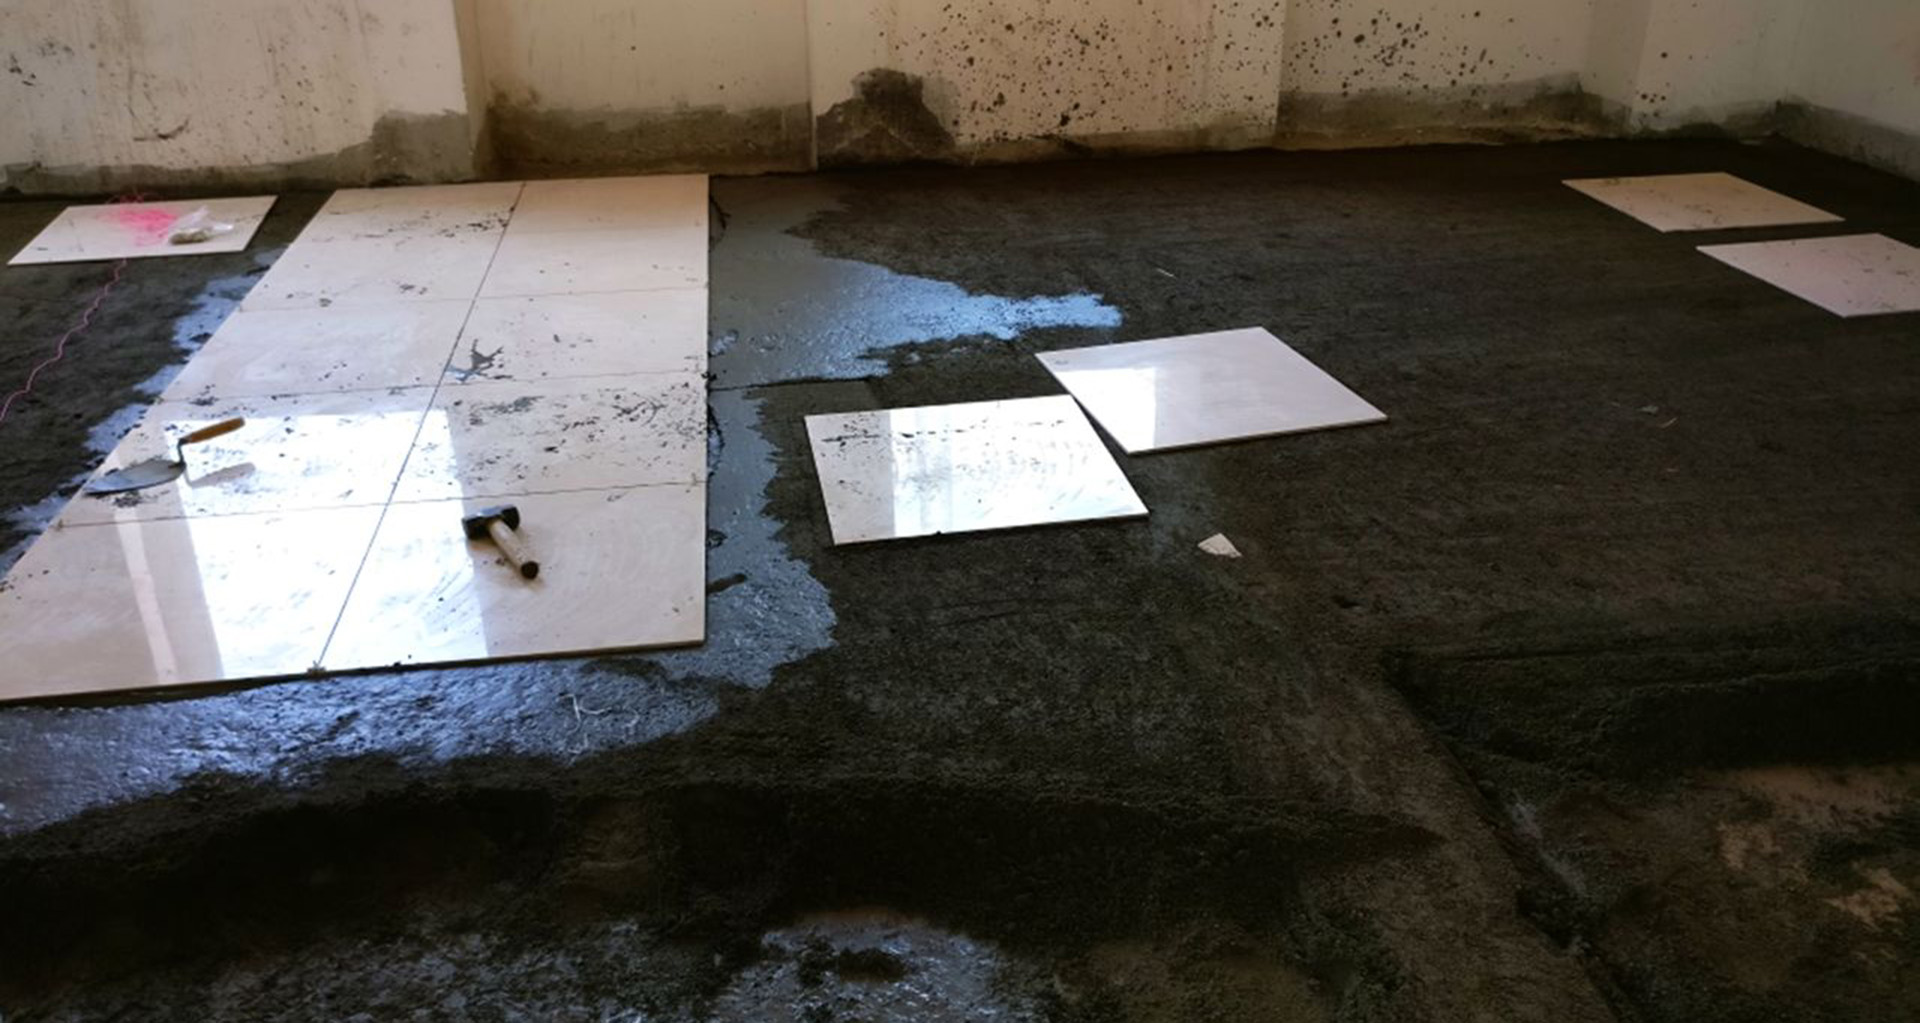
Image – 8 | In this picture where Wet on Wet process is followed, the walls are affected by the capillary action from the wet undertile mortar. | © UniPro
Though the process says “wow”, there is nothing ‘wow” about it. The tile that is laid with “WoW’ (wet-on-wet) tiling process (Majority of the tiling contractors use this process) where under tile cement doesn’t receive any curing, turns to dust which is ready to absorb water/moisture whenever it is available.
4) This WoW system along with the tile is typically constructed above DPC level and is in constant touch with the wall masonry. (See Image – 8)
What happens beneath the tile when water table/moisture rises?
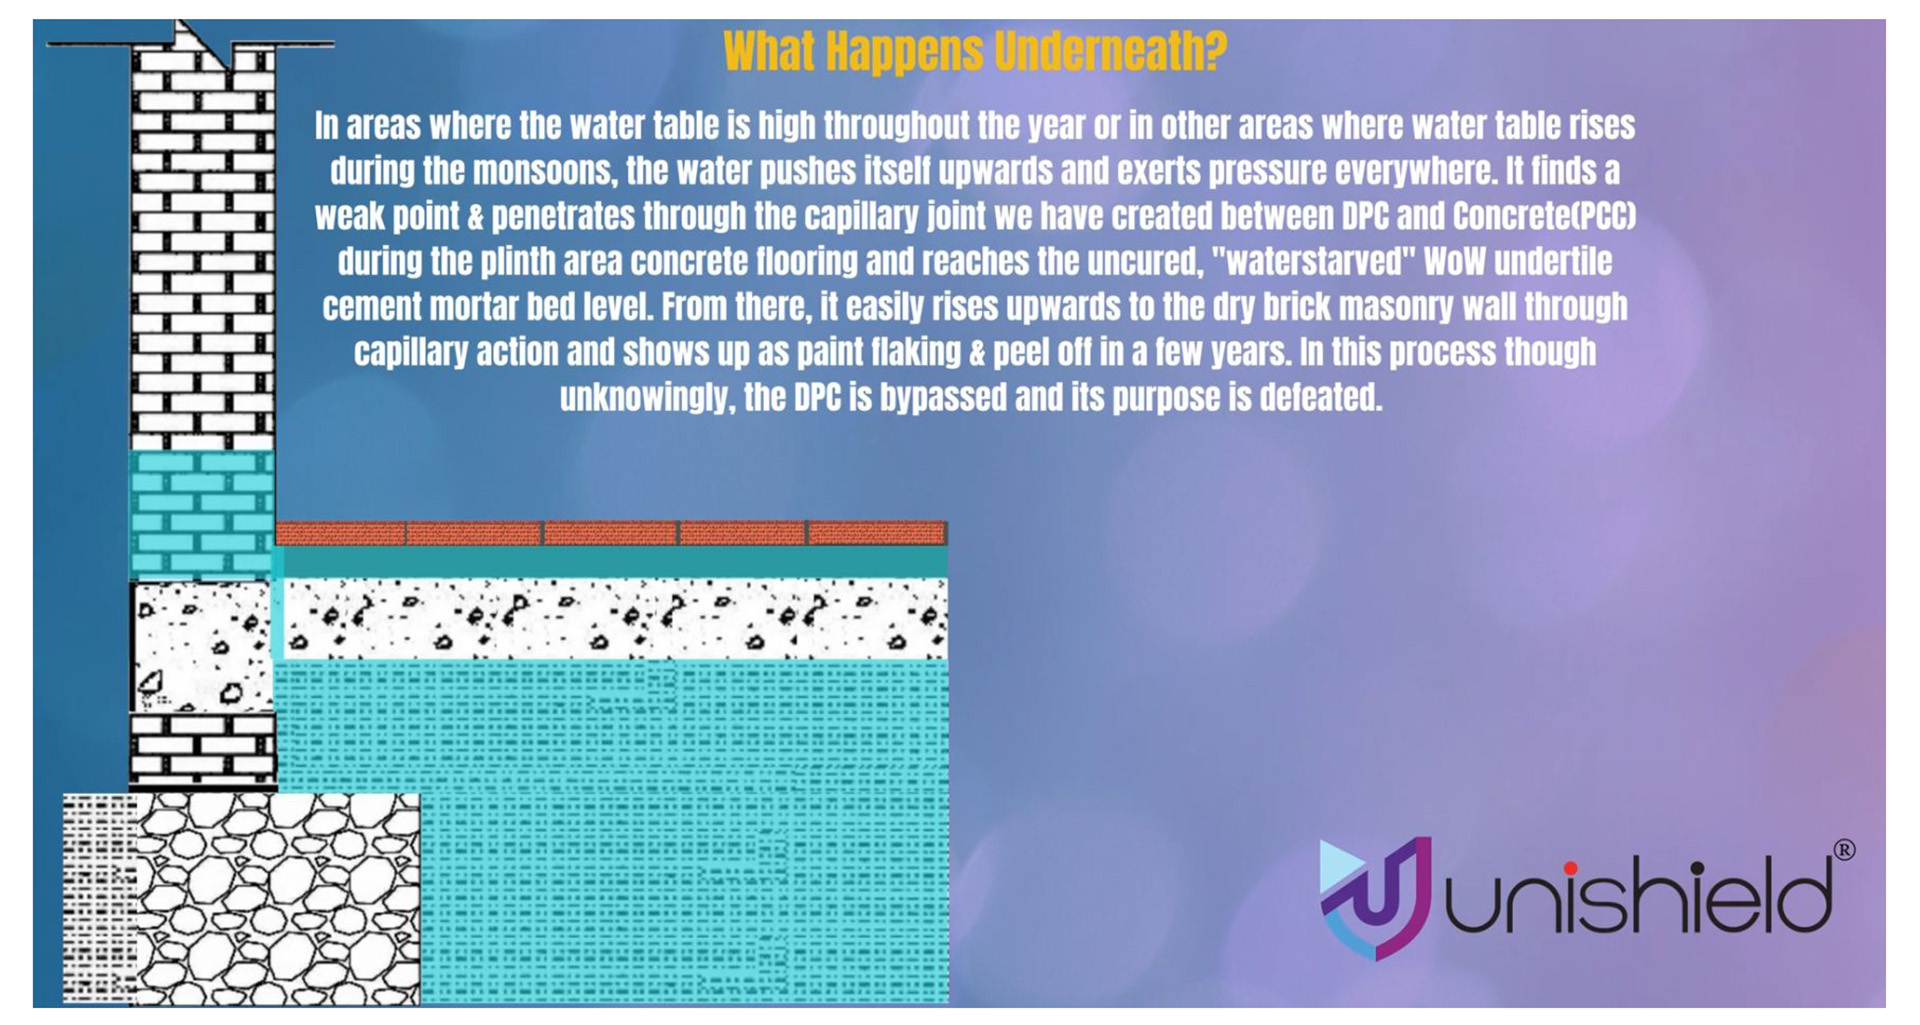
Image – 9 | How capillary rise causes dampness in walls. | © UniPro Waterproofing
Water is notorious for its capability to travel through capillaries. While you sip your morning cuppa, if a drop of coffee happens to flow out to the bottom, you often see a ring formed under in the next instant. That’s the power of capillary!
Coming back to our foundation, when water table/moisture rises, it travels to the drier places through the capillary area we have created between DPC and Floor PCC. Once it reaches the under tile which is dry and deprived of curing, it laps it up like a sponge. Further, from there it finds drier pastures such as wall masonry which is in direct contact with the FFL tile and undertile level.
Thus we unknowingly defeat the purpose of DPC and other foundation systems which are designed to disconnect ground water from wall masonry.
Watch the video of how capillary rise happens in residential foundations.
So How Such a Situation can be Avoided?

Image – 10 | Foundation waterproofing process when plinth beam acts as DPC | © UniPro Waterproofing
- Firstly, U-Joint plays a crucial role of stopping the creation of capillaries between floor PCC and DPC. At the time of floor PCC, a structurally sound bonding agent is brushed where floor PCC joins the DPC horizontally. This is the 10cm area we left without any treatment during the plinth beam stage. While the treatment is tacky, floor PCC is laid to create a monolithic joint of floor PCC and DPC, devoid of any capillary gaps.(See image – 10 shown above)
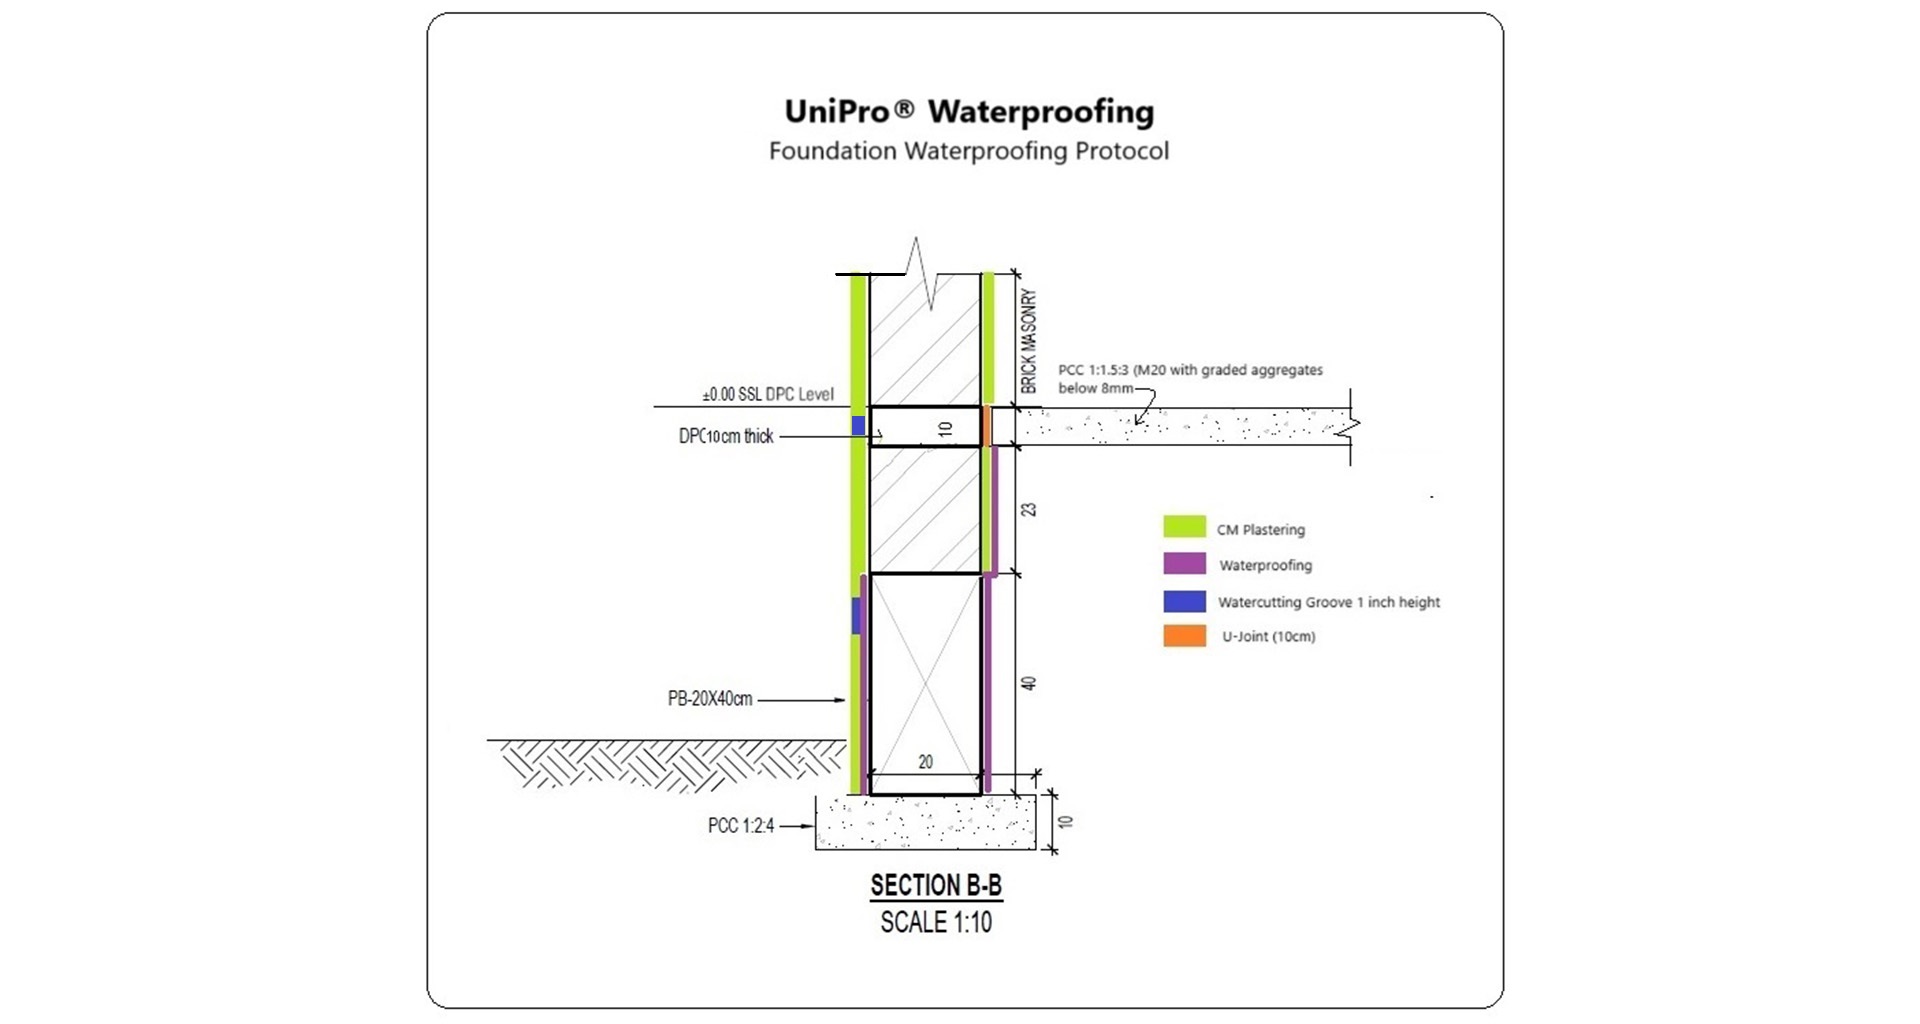
Image – 11 | Foundation waterproofing process when DPC is constructed above plinth beam | © UniPro Waterproofing
- Secondly, the floor PCC to be upgraded to M20 and above grade with 8mm downwards aggregates being used instead of 20mm. This will ensure a proper, dense grade slab kind of floor which will capable to resist water absorption. After all what is the point of closing the gate when the compound wall is wide open, right? The point to remember here is that floor PCC to be considered as a waterproofing course, not a filling course.
- If budget allows, lay the tile with a good quality tile adhesive instead of WoW system.
In conclusion, these steps form a comprehensive protocol to achieve a robust and waterproof foundation for your residence. Following these measures during the construction process will not only prevent capillary rise but also contribute to the longevity and durability of your home. By investing in effective foundation waterproofing, you are securing the future of your residence against the challenges of moisture and ensuring a safe and lasting shelter for generations to come.
Disclaimer: Whilst the information contained herein is true, accurate and represents our best knowledge and experience, no warranty is given or implied with any recommendations made by us, our representatives or company, as the conditions of use and the competence of any labour involved in the application are beyond our control. We strongly advise all readers and stakeholders concerned to conduct their own thorough research and establish a quality control process tailored to their specific needs and requirements. Images shown are for indicative purposes only.


Well written and detailed and exactly what i was searching for. I have been researching online on how to to prevent lower wall capillary issue for my new home construction and I came across this post. It is exactly what I was looking for. I am a civil engineer with years of experience and neither I have ever studied this during my education days nor have seen any construction professionals talking about it. Now I know what is the cause of dampness on walls and how to stop it. Thanks much Unipro team. Excellent post!